Music schools, online lessons, self-teaching apps, and similar tools have one thing in common – they require musicians to invest time before they can apply newfound skills to practice.
Some people are fast learners, and others prefer to take things slow, but the fact remains that many people don’t have months or years to learn guitar. With Card Chords, learning the basic guitar chords only takes a couple of minutes.
Even though this tool was specifically designed to be as beginner-friendly and as self-explanatory as possible, it wouldn’t hurt to learn how to properly utilize the benefits Card Chords tabs have to offer. That’s why we wanted to give you a few handful tips and tricks about how to take your learning experience to the next level and master elementary guitar chords today, so let’s start from the top.

What Are Card Chords?
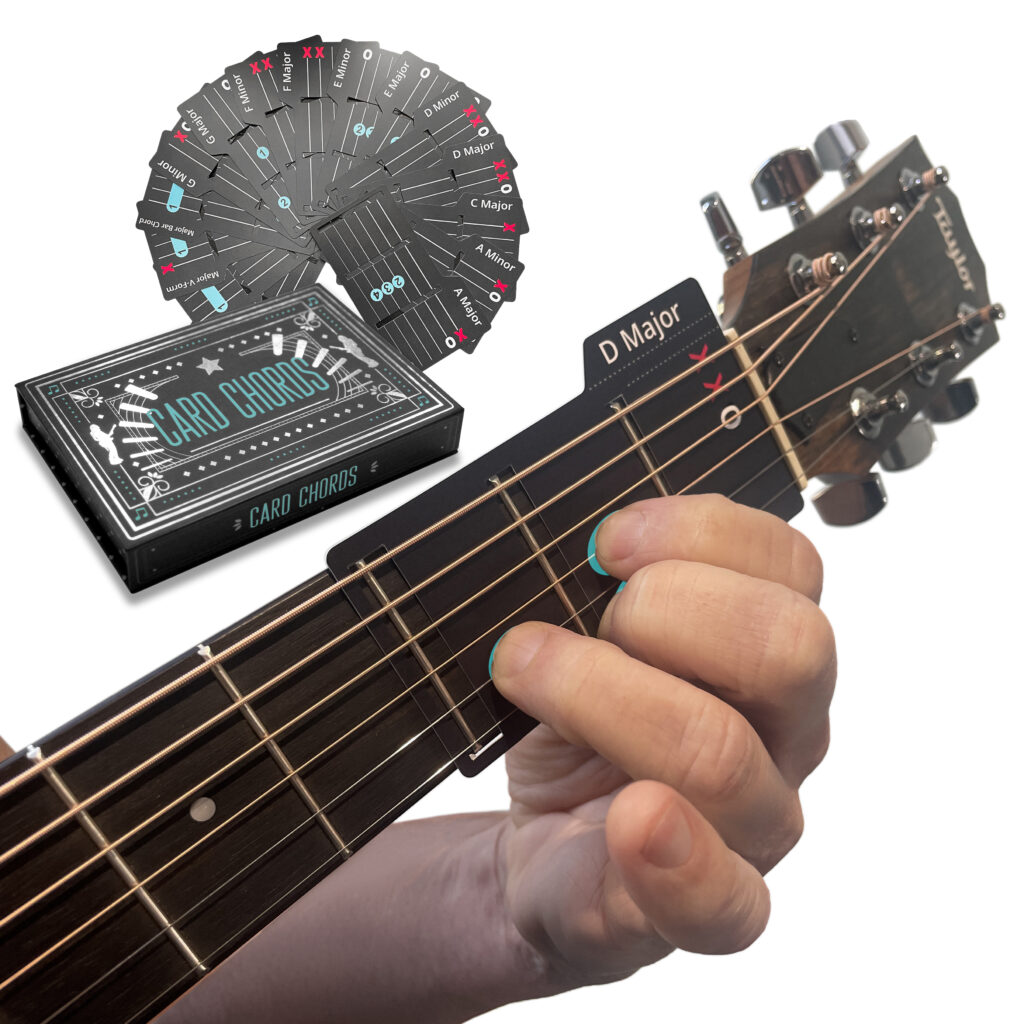
Recognized among the most revolutionary guitar-learning tools at this year’s NAMM Innovator Showcase, Card Chords are perforated card-shaped tabs that allow new learners to skip the boring parts and immediately dive into the core of playing simple chords.
Card Chords are visual reminders complete with enumerated finger position markers and a chord nameplate, but more importantly, they enable new learners to play “over” the tab.
Unlike regular or digital tabs that require the musician to actively look at the paper/screen, Card Chords promote a more active learning experience by empowering the guitarist to learn while they play and play while they learn.
How to Use Card Chords – Step-by-Step Guide
After selecting the right edition of Card Chords that can fit your guitar, all you have to do is simply pick a chord you want to learn, place the tab on your guitar, follow the dots to align your fingers with the right numbers, and strum. It’s as simple as that. Let’s dive into deeper details.
Step 1: Choose the Right Card Chords
Guitars may come in all colors, shapes, and sizes. They also feature different neck and fingerboard dimensions, which is very important when choosing your Card Chords set.
This guitar-learning tool is available in three editions, which are almost identical. Each edition was meant to accommodate guitar types that have the same-sized fingerboards so that the Card Chords tabs can properly lock onto the board.
The available editions include Stratocaster, Les Paul, and Universal. Stratocaster Edition Card Chords were designed to fit all versions of Stratocaster, Telecaster, Ibanez, Jackson, Yamaha, and Squier guitars. Les Paul Edition tabs are meant to be used with Gibson, Gretsch, or Epiphone guitars.
If the logo on your guitar’s headstock is blurred or if you aren’t sure which brand of guitar you own, the Universal Edition Card Chords are the best choice since they can fit any guitar except acoustic ones with nylon strings.

Step 2: Pick the Chord You Want to Learn
Card Chords is a deck that consists of numerous perforated tabs. Each tab corresponds to one chord, such as D Major, A Minor, C Major, F Major, and such.
Even though these are all basic chords, some are easier than others; some of them you may already know or have tried playing before. For instance, A Minor is among the easiest elementary chords, while D Major requires a certain degree of finger dexterity.
Open your pack of Card Chords and take a look at each tab. You will notice that all of them feature blue circles with little numbers inside them and red “X” marks. The blue circles depict the finger positioning for the desired chord while the “X” symbols tell you which strings should not be played. Finally, choose the chord you wish to learn how to play, and let’s continue.
Step 3: Place the Card Chord on Your Guitar’s Fretboard
To start using Card Chords tabs, all you have to do is simply place the Card Chord on the first three frets of your guitar’s board. Each Card Chord features three vertical holes that are large enough for the fret bars to pass through, yet small enough to prevent the tab from falling out.
Hold the guitar in your right hand, preferably from a seated position so that your thighs can be used as extra support, and align the Card Chords tab with your left hand. Once in place, the tablature will remain locked in position so that you can easily play over it.
Step 4: Practice the Depicted Finger Positions
Now that your Card Chords are on the guitar, take a look at the aforementioned blue circles. You don’t have to memorize the patterns; just become familiar with the layout before you place your fingers on them.
Instead of learning the sequence of numbers, the first thing you should memorize is what these numbers mean. The number “1” corresponds to your index finger; the number “2” is the middle finger; the number “3” is the ring finger, and the number “4” is the little finger.
A tip for easier learning, just skip your thumb, and you’ll be able to easily remember that the numbering starts with your index finger. With that in mind, place your fingers on the tab, then pull back, and repeat. Do this several times, and you will notice that your fingers will start moving on their own. Finally, strum your guitar, and you’ll play that chord!
Step 5: Remove the Card Chords Tab
The last part is the easiest one, and it will enable you to play the desired chord without any external help. After following all the steps, just remove the tab from the board, and keep your fingers in the prescribed positions. Again, strum and you’ll notice that you can play that chord even without Card Chords.
Ready to Start Learning? Get Your Card Chords and Master Basic Chords Today
Now that you know how to properly use Card Chords tabs, you just need to grab your first deck, and you’ll be set to go. Just follow this link and choose your desired edition of Card Chords, and our team will help you with your order.

